- Introduction
- Creating the Discord Bot and Webhook
- Installing Python 3, Cloning the Repository
- Editing GovBot.py and Configuration
- Running the Bot
- Setting Up a Cron Job
- Review
- Additional resources
Introduction
Purpose
The purpose of this guide is to demonstrate setting up an instance of Reecepbcups’ Cosmos Governance Proposal Bot to generate Discord messages for governance proposals.
This guide assumes the reader is familiar with Discord, the Cosmos ecosystem, and has an intermediate understanding of technology.
The user will be required to follow instructions to create a bot, set up a development environment, clone a repository, modify configuration files, run a bot, and set a scheduled task. This guide will provide a very broad, in-context overview of software such as Git, Python, and Cron.
This guide will not cover getting started with Python or running this bot with a dedicated Twitter account (see @CosmosGovNotifs for a production example of this functionality).
In this guide, we will be setting up https://github.com/Reecepbcups/cosmos-governance-bot with discussion thread support:

Prerequisites:
- a Discord account
- administrator role in a Discord server (or contact with a server administrator)
- an environment with Python 3 installed
Creating the Discord Bot and Webhook
Navigate to the Discord Developer Portal and log in. It’s fine to use your personal account, but if your bot’s Discord configuration is to be managed by others, you should instead use a separate, dedicated account.
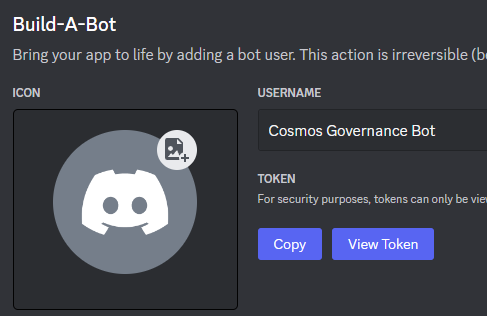
Click “New Application” and give it a name - we will call it “Cosmos Governance Bot.” Once created, click “Bot” on the left side, then “Add Bot” in the center and “Yes, do it” to confirm. Once your bot has been created, click Copy to obtain the bot token and paste it in a text editor for now.
 (example format: OTUyMDgwOTQ5NzcwODUwMzY1.Yiw0ew.8Fsxi4I4IMgmAICyh_HdsIXL_jo)
Navigate to OAuth2 in the sidebar, click URL Generator, select the bot scope, and select the following roles:

This will generate a URL at the bottom - copy this into your browser and invite it to the server (or pass it to a server administrator to invite).
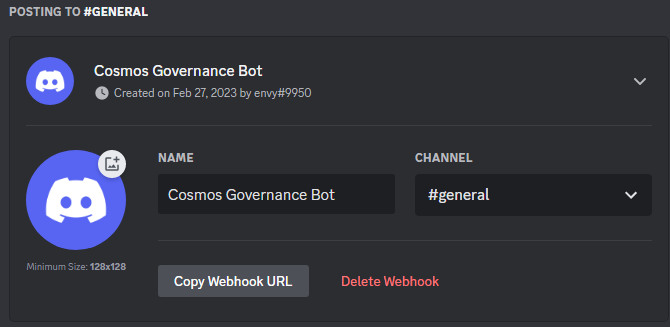
In Discord, click your server name in the top-left > Server Settings. Under the Apps section, select Integrations, then Create Webhook. Enter a display name, select the channel you want this bot to post in, Save Changes, and Copy Webhook URL.

You will also need the Channel and Guild (server) IDs to specify where you want the bot to post. Right-click the desired server name and channel name, clicking “Copy ID” for each.
You should now have four unique values: Bot Token, Channel ID, Guild/Server ID, and Webhook URL.
Installing Python 3, Cloning the Repository
There are many ways to get started with a Python environment; see Real Python’s guide for instructions on installing Python 3 on a variety of operating systems. This guide will assume the reader has set up an environment similar to my own: Python 3.9.2 in a Linux environment (Debian 11).
At the time of writing (February 27, 2023), the repository’s current commit (62f8e81) is not functional due to upstream dependency issues. Per a brief discussion with Reece, we will instead be using commit e32e37. Open a terminal to your directory of choice and enter the following commands:
git clone -n https://github.com/Reecepbcups/cosmos-governance-bot
cd cosmos-governance-bot
git checkout e32e37af985182429077bba69934a69a365c7ba3
Editing GovBot.py and Configuration
GovBot.py
Open GovBot.py in your text editor of choice and modify Lines 32 and 33 to both read True:
DISCORD = True
DISCORD_THREADS_AND_REACTIONS = True
You can also modify Line 38 if you would like the bot to link to a particular proposal source - I substituted Keplr for Mintscan.
secrets.json
Save GovBot.py, open secrets.json, and substitute the four values obtained in step one.
Running the Bot
Once you’ve saved your configuration, it’s time to run the bot:
python3 GovBot.py
Leave this running for a few minutes and you should receive a series of posts in your denoted channel (assuming there are Interchain governance proposals presently in voting period). Going forward, you probably don’t want to receive posts for everything - modify line 21 in secrets.json to specify particular chains according to their definitions in ChainApis.py. For Juno and Akash:
"TICKERS_TO_ANNOUNCE": ["juno","akt"],
Setting Up a Cron Job
After verifying the bot’s output is correct, run crontab -e in your terminal and add the following line, modifying the path to your bot’s folder:
*/30 * * * * cd /path/to/your/cosmos-governance-bot && python3 GovBot.py
This line specifies a scheduled task: every 30 minutes, instantiate a process that changes directory to cosmos-governance-bot and runs GovBot.py.
Review
Additional Information
- Due to the rolling release nature of this script and its dependencies, I do not intend to maintain this guide beyond its initial publication. Please direct any future technical questions to Reece.
- Discord threads are created in slow mode with a timeout of five seconds. To change this, modify line 145 in GovBot.py to specify the number of seconds.
tl;dr:
- create Discord webhook, point it to a text channel
- create Discord bot, obtain bot token
- create OAuth2 URL to invite the bot to your server with specified permissions
- clone commit
e32e37of cosmos-governance-bot repo - modify
GovBot.pyandsecrets.jsonwith specified values - run bot
- set cron job to run bot at specified interval
Additional resources
Install Python: Detailed Instructions for Window, Mac, and Linux
Discord Developer Portal - Documentation
Intro to Webhooks - Discord
If you found this script useful, give Reece a follow on Twitter or Github. If you found this guide useful, feel free to follow me on Twitter or show your support by delegating to a Neta DAO validator.